 Wingware
Wing Tips: Extend Microsoft Excel with Python Using Wing and PyXLL
This Wing Tip describes how to use Wing and PyXLL to develop and debug Microsoft Excel add-ins that are written in Python. PyXLL is a commercial product that embeds Python into Microsoft Excel on Windows. It allows you to expose Python code to Excel as worksheet functions, macros, menus, and ribbon toolbars.
Install PyXLL
Before getting started you will need to install Microsoft Excel, Python or Anaconda, Wing, and PyXLL if you don't already have them.
Important: Excel, PyXLL and Python all need to be either 32 bit or 64 bit and can't be mixed. To find out what version of Excel you have see Do I have 32 bit or 64 bit Excel? You will also need to match the version of PyXLL that you download to your Python version.
To install PyXLL, unzip the download and then edit the included pyxll.cfg and set executable to the full path of your Python executable. This can be a python.exe from a virtualenv or conda env, or a base Python install. For example:
[PYTHON]
executable = C:\Users\joebloggs\Anaconda\envs\py38\python.exe
Next, install the PyXLL add-in into Excel. To do that, open Excel and select the File menu. Navigate to Options, then Add-Ins, and click the Manage Excel Add-Ins button. Select Browse, navigate to the folder where you unzipped the PyXLL download, and select the pyxll.xll file. If Excel asks if you want to copy the add-in to your add-ins folder, select No as you want to leave it where it is. The PyXLL add-in should now appear in your list of loaded add-ins.
If you're having trouble installing the add-in, check the PyXLL log file located in the logs folder where you unzipped PyXLL. You can change the log level to debug in your pyxll.cfg file to obtain more detailed logging. If you get stuck contact the PyXLL support team who will help you get started.
You can also find more detailed installation instructions in Installing the PyXLL Excel Add-In.
Create a Wing Project
Next create a new project in Wing with New Project in the Project menu. Select Use Existing Directory and select the directory where you installed PyXLL and set Project Type to PyXLL.
After pressing Next, select Use Existing Python, set Python Executable to Command Line and enter the same Python used as the executable in pyxll.cfg above:
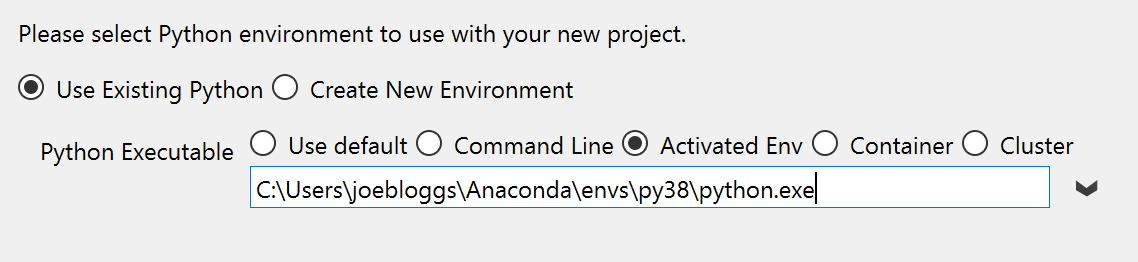
Now you can submit the dialog and Wing will create and configure your new project.
Write an Excel Function With PyXLL
Before we look at setting up Wing's debugger, let's write an Excel function to debug. This example uses pandas and numpy, so you will need to make sure those are installed into the Python you configured above. If you are using Anaconda, then you should already have them. In other cases, this can be done with pip. For example:
C:\Users\joebloggs\Anaconda\envs\py38\python.exe -m pip install pandas numpy
Now create a Python module for your Excel function by creating a new directory on disk and placing a Python file into that directory, with the following contents:
from pyxll import xl_func
import pandas as pd
import numpy as np

@xl_func("int, int: dataframe<index=True>", auto_resize=True)
def random_dataframe(rows, columns):
    """
    Creates a DataFrame of random numbers.

    :param rows: Number of rows to create the DataFrame with.
    :param columns: Number of columns to create the DataFrame with.
    """
    data = np.random.rand(rows, columns)
    column_names = [chr(ord('A') + x) for x in range(columns)]
    df = pd.DataFrame(data, columns=column_names)

    return df
The directory and filenames can be anything, but in this example we'll use C:\Users\joebloggs\Projects\PyXLL\src for the directory and xlfuncs.py as the file name.
Next update the pythonpath and modules setting in the same pyxll.cfg file where you set executable earlier:
[PYTHON]
pythonpath =
    C:\Users\joebloggs\Projects\PyXLL\src

[PYXLL]
modules =
    xlfuncs
Note that the entry under modules omits the .py in the filename.
Once this is done, reload the PyXLL add-in via the PyXLL ribbon tool bar or the add-ins menu in Excel, or restart Excel. PyXLL can also be configured to auto-reload after any change made to the Python code. See Reloading in the PyXLL guide for details.
How it Works
As you may already have figured out, the example Excel function random_dataframe given above creates a pandas DataFrame containing random data, and returns that to Excel as an array function.
The @xl_func decorator tells PyXLL to use it as an Excel worksheet function. The first argument to the decorator is an optional function signature. PyXLL uses this to determine how arguments and return values should be converted between the Excel and Python data types. The example here uses the dataframe return type to tell PyXLL to expand the pandas DataFrame to an array of values when returning to Excel, including the index. The auto_resize option tells PyXLL that the Excel formula should be resized automatically to fit the size of the returned array.
Invoke the PyXLL Function
Now you should be able to call the random_dataframe function from Excel by entering it as a formula in an Excel worksheet. This is done in the same way as Excel's standard functions by using = followed by the function name, for example =random_dataframe(10, 10):
Shown Above: Type "=random_dataframe(10,10)" and press Enter to insert a random DataFrame into Excel
For complete instructions on writing Excel worksheet functions in Python with PyXLL, please see Worksheet Functions in the PyXLL user guide.
Set up Wing's Debugger
To enable debugging, you need to tell Wing to accept connections from Python code running under Excel and then configure and load the debugger into Excel. To do this from the project you created earlier, click on the bug icon in the lower left of Wing's window, and check Accept Debug Connections:
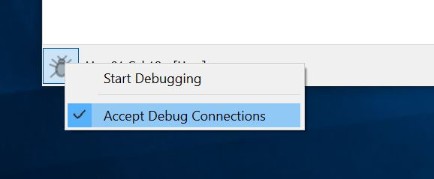
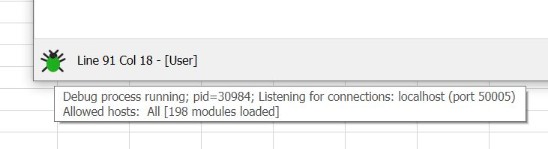
Now hovering your mouse over the bug icon should show that Wing is listening for externally initiated debug connections on the local host:
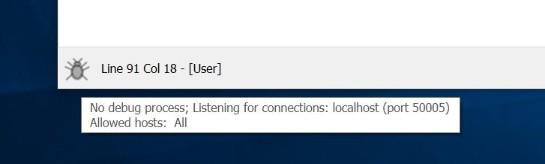
If Wing is not listening, it may be that it has not been allowed to do so by Windows. In that case, try restarting Wing so that Windows will prompt you to allow network connections.
Next, find the Install Directory listed in the About box accessed from the Help menu in Wing. Copy wingdbstub.py from that directory to the directory that contains xlfuncs.py.
Then open your copy of wingdbstub.py and make the following changes:
- Make sure WINGHOME is set to the full path of your Wing installation, where you just found wingdbstub.py. This is usually set automatically during installation of the IDE.
- Change the value of kEmbedded to 1. This alters some aspects of how code is debugged, to match the environment your Python code will be running in.
To get Excel to load Wing's debugger, add wingdbstub to the modules list in your pyxll.cfg file:
[PYXLL]
modules =
    wingdbstub
    xlfuncs
Finally, restart Excel or reload the PyXLL add-in. When the wingdbstub module is loaded it will connect to Wing and the bug icon in the lower left of Wing's window will turn green, in order to let you know that the debugger is connected:
Debugging Python Code Invoked from Excel
You can now step through the Python code running in Excel.
To try it out, set a breakpoint in xlfuncs.py by opening it in Wing and clicking on the leftmost margin next to the the line that reads data = np.random.rand(rows, columns) within random_dataframe. When you call the function from Excel, the debugger will stop on the breakpoint:

Shown Above: Enter "random_dataframe(10,10)" into Excel on the left, reach a breakpoint in Wing on the right, and step through code
From here, you can inspect your debug process in the Debug Console (Wing Pro only) or Stack Data in Wing's Tools menu, set other breakpoints or conditional breakpoints (Wing Pro only), step through code, and so forth. For more information on the capabilities of Wing's debugger, see the Debugger Quick Start or the Tutorial in Wing's Help menu.
That's it for now! We'll be back soon with more Wing Tips for Wing Python IDE.
As always, please don't hesitate to email support@wingware.com if you run into problems, have any questions, or have topic suggestions for future Wing Tips!